
If you are using Webmin to administer your Linux box, here are the steps to run ASP.NET Core 6 application with Apache. If you are interested in installing .Net Core 3, you may use this article.
Prerequisites
- Ubuntu 20.04
- Webmin
I assume that you have setup your server, Webmin and everything is up and running.
Install .Net Core
Here is a compilation of commands to install the .Net Core 6.0 on Ubuntu 20.04. Following is a list of commands without any clutter and specific for Webmin / Virtualmin setup.
Open a terminal with sudo user and execute following command to register Microsoft key
Following commands are for Ubuntu 20.04
wget https://packages.microsoft.com/config/ubuntu/20.04/packages-microsoft-prod.deb -O packages-microsoft-prod.deb

sudo dpkg -i packages-microsoft-prod.deb

rm packages-microsoft-prod.deb
Now install ASP.NET Core 6.
Please note that unlike ASP .NET Core 3.1, you need to just install ASP.Net Core runtime which itself includes the .Net Core runtime.
sudo apt-get update

sudo apt-get install -y apt-transport-https

sudo apt-get update

sudo apt-get install -y aspnetcore-runtime-6.0
If you want to install other .Net Core version, follow the tutorial from Microsoft Docs to get the correct command.
Setup .Net Core Website
Using Webmin, create a new Virtual Server. It would create a new folder “/home/Your_Virtual_Server”. Here create a new folder called “netcore_ Your_Virtual_Server” and upload and configure your .Net Core application to this folder.
Using Terminal, navigate to this folder and execute the following command to quickly verify if everything is working as expected or not.
cd "/home/Your_Virtual_Server/netcore_Your_Virtual_Server"

dotnet "YourApp.dll"
Above command runs the application on http://localhost:5000 address by default. You can press Ctrl+C to terminate this application but continue running the application and keep this terminal open.
Note: Typically .NET Core application runs on port 5000 but it is possible that your application or application file may contain code/settings which forces the application to run on different port. Above command will spit out the URL with port number on which the application is running. Make sure to use the correct URL and port number for the rest of the article.
Setup Apache Proxy Module
Make sure Apache Proxy module is enabled.
Go to Webmin > Servers > Apache Webserver on left hand side menu.
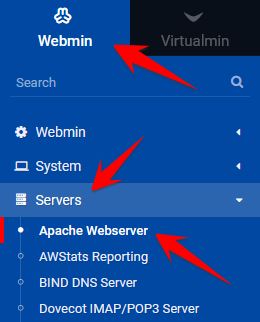
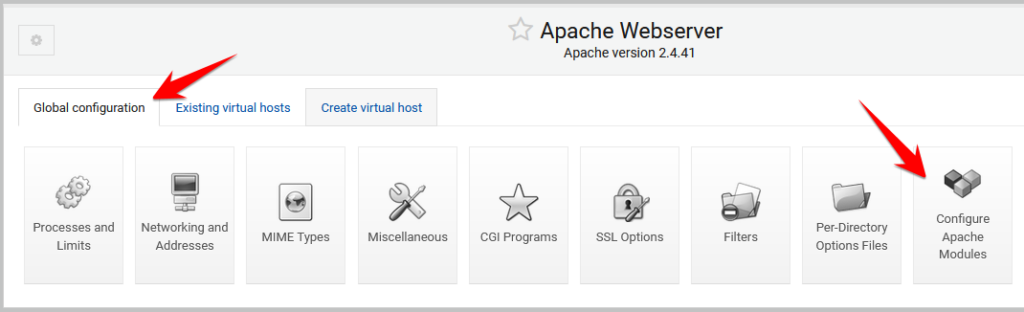
Click on “Global Configuration” tab > Configure Apache Modules.
Make sure following modules are enabled.
- proxy
- proxy_balancer
- proxy_connect
- proxy_fcgi
- proxy_http
I don’t how which modules are really needed but above list is from my configuration.
If any of these modules are not enabled, tick/check those modules and click on “Enable Selected Modules” button at the bottom.
Return back to Global Configuration.
Top right corner shows a button to apply the changes. Click on the button and Apache will apply changes.
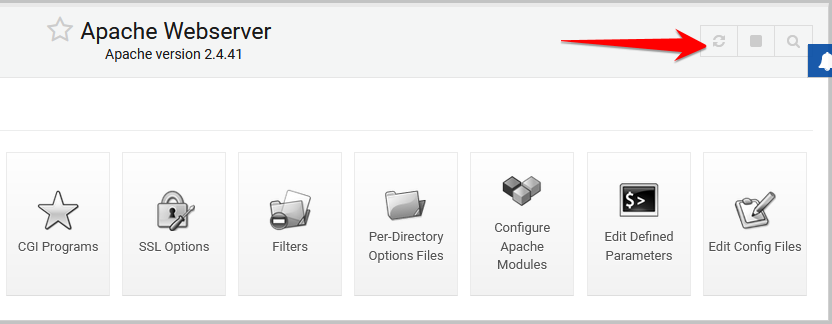
Note: Without applying Apache changes, reverse proxy will not work.
Setup Apache Virtual Host
While the dotnet core application is running, we want to setup Apache.
Go to Webmin > Servers > Apache Webserver on left hand side menu.
Click on “Global Configuration” tab > Edit Config Files > Select your Virtual Server Config file “/etc/apache2/sites-available/MyDomain.conf” from the list.
If you have non SSL and SSL both the sites enabled, you will see two <VirtualHost> tags – one for non SSL site and another for SSL site.
If you have setup non SSL to SSL redirection within <VirtualHost>, you need to change only SSL <VirtualHost>. Otherwise, you need to change for both <VirtualHost> tags.
Under <VirtualHost> tag, add following settings to use proxy
RequestHeader set "X-Forwarded-Proto" expr=%{REQUEST_SCHEME}
ProxyPreserveHost On
ProxyPass /.well-known !
ProxyPass / http://127.0.0.1:5000/
ProxyPassReverse / http://127.0.0.1:5000/
Above settings sets the special header, excludes Let’s Encrypt SSL request and forwards all other requests to the dotnet core application running on http://127.0.0.1:5000/
Save the changes and go back to the Apache Webserver screen.
Top right corner shows a button to apply the changes. Click on the button and Apache will apply changes.
Note: Without applying Apache changes, reverse proxy will not work.
Now try to visit your website in a browser and you will get response from dotnet core application.
At this moment, your dotnet core application is working as expected so now in existing terminal where you started the dotnet core application, press “Ctrl+C” to terminate the dotnet core application that was running.
Monitor the Application
In above portion, you have manually ran the application but now we want this application managed by Linux. For this, we need to create service.
Create a service file “/etc/systemd/system/kestrel-Your_Virtual_Server_APP.service” using Webmin. Change the file name “kestrel-Your_Virtual_Server_APP.service” as per your need.
Open the service file in Webmin and paste following text. Make change to the file as per your need
[Unit]
Description= Your_Virtual_Server_APP .Net Core 6 App

[Service]
WorkingDirectory=/home/Your_Virtual_Server/netcore_Your_Virtual_Server
ExecStart=/usr/local/bin/dotnet /home/Your_Virtual_Server/netcore_Your_Virtual_Server/YourApp.dll
Restart=always
Restart service after 10 seconds if the dotnet service crashes:
RestartSec=10
KillSignal=SIGINT
SyslogIdentifier=kestrel-Your_Virtual_Server
User=Your_Virtual_Server

[Install]
WantedBy=multi-user.target
In above text, change Description, WorkingDirectory, ExecStart, SyslogIdentifier and User as per your configuration.
Enable service by executing following command using sudo user at terminal
sudo systemctl enable kestrel-Your_Virtual_Server_APP.serviceAt this moment, your service is enable. Now go to Webmin > System > Bootup and Shutdown.
Here you will see your service in a list. Select your service by clicking on a checkbox. Go all the way down and click on “Start on Boot” in order to start this service on bootup. Again select this service and click on “Start” button to start your service.
You are all set and now your .net core application is happily running behind the Apache proxy.
If for any reason, you face any problem with starting the kestrel application, use the following command to get the log
sudo journalctl -fu kestrel-Your_Virtual_Server_APP.service --since today
Leave a Reply