
When I migrated a site to a new Ubuntu 20 server, I faced an issue. I have a .Net application that is connecting to the my website. If the application is running on Windows 7, it cannot connect to the Website but if the application runs on Windows 10, it works. I figured out that there is something wrong with the SSL connection and hence the application cannot connect.
Even though my old and new servers are Ubuntu 20, somehow both support different SSL versions. After researching, I found out that in order to increase security, Ubuntu 20 supports only TLS 1.2 and older TLS are disabled by default on new installation. If you have a server upgraded from Ubuntu 18 to Ubuntu 20, it supports recent and older TLS.
It seems like Windows 7 can work only using TLS 1.1 or TLS 1.0, the application stopped connecting to the Website. Enabling older TLS version is not a straight forward path. After researching for days and reading lots of threads, here are the things that worked for me.
Enable Older TLS Version Using Webmin
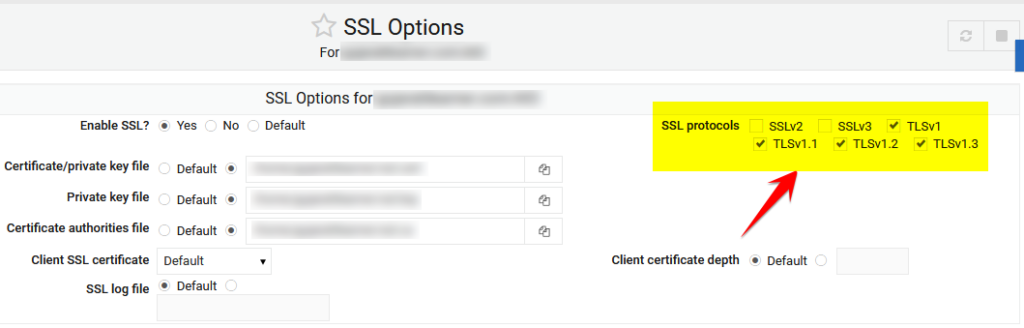
Enabled TLS 1.0 and 1.1 from Webmin UI. Go to Webmin > Servers > Apache Webserver > Existing virtual hosts tab > YOUR_VIRTUAL_SERVER:443 > SSL Options > SSL protocols > Tick TLS v1.0, 1.1, 1.2, 1.3 and Untick SSLv2 and SSLv3.
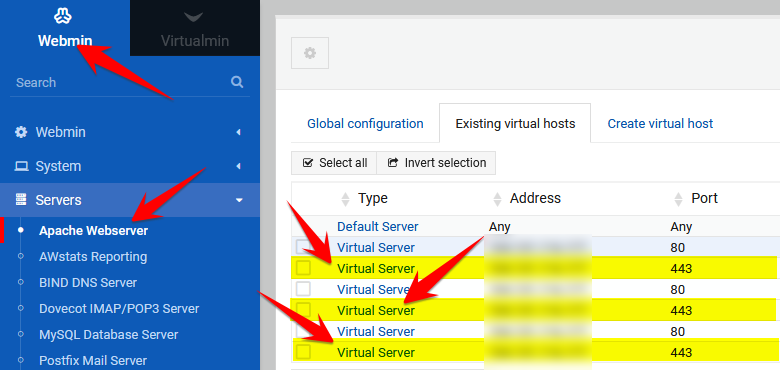
Make sure you follow the above steps for ALL SSL enabled virtual servers because SSL settings across different virtual servers are somehow affecting entire Apache server.
Edit Apache Configuration
Go to Webmin > Servers > Apache Webserver > Global configuration tab > Edit Config Files > select etc/apache2/apache2.conf
If you see SSLProtocol and/or SSLCipherSuite, replace those lines with following.
SSLProtocol all -SSLv2 -SSLv3
SSLCipherSuite ECDHE-ECDSA-AES128-GCM-SHA256:ECDHE-RSA-AES128-GCM-SHA256:ECDHE-ECDSA-AES256-GCM-SHA384:ECDHE-RSA-AES256-GCM-SHA384:ECDHE-ECDSA-CHACHA20-POLY1305:ECDHE-RSA-CHACHA20-POLY1305:DHE-RSA-AES128-GCM-SHA256:DHE-RSA-AES256-GCM-SHA384:DHE-RSA-CHACHA20-POLY1305:ECDHE-ECDSA-AES128-SHA256:ECDHE-RSA-AES128-SHA256:ECDHE-ECDSA-AES128-SHA:ECDHE-RSA-AES128-SHA:ECDHE-ECDSA-AES256-SHA384:ECDHE-RSA-AES256-SHA384:ECDHE-ECDSA-AES256-SHA:ECDHE-RSA-AES256-SHA:DHE-RSA-AES128-SHA256:DHE-RSA-AES256-SHA256:AES128-GCM-SHA256:AES256-GCM-SHA384:AES128-SHA256:AES256-SHA256:AES128-SHA:AES256-SHA:DES-CBC3-SHA:@SECLEVEL=1
In above line, we are instructing Apache to enable all protocols except SSLv2 and SSLv3. It is same as what we have done using UI in earlier step.
For SSLCipherSuite, I have used https://ssl-config.mozilla.org/ site to generate Apache Cipher with “Old” configuration. Also note that I have added :@SECLEVEL=1 at the end of the line.
Now go through each virtual server conf file /etc/apache2/sites-available/YOUR_VIRTUAL_SERVER.conf to make sure the following line exists within <VirtualHost SOME_IP_ADDRESS:443> section (and not SOME_IP_ADDRESS:80) section.
SSLProtocol all -SSLv2 -SSLv3You must verify and/or change for ALL virtual servers.
In /etc/apache2/mods-available/ssl.conf, make sure to have following line
SSLProtocol all -SSLv3Along with this, I have different values for SSLCipherSuite on two different servers but it works on both servers so I assume that no change is needed for SSLCipherSuite key in ssl.conf file.
OpenSSL Config File Change
Open the file /etc/ssl/openssl.cnf in the editor. At the top of the file, add line openssl_conf = default_conf.
# This definition stops the following lines choking if HOME isn't
# defined.
HOME			= .

# Extra OBJECT IDENTIFIER info:
#oid_file		= $ENV::HOME/.oid
oid_section		= new_oids

# System default
openssl_conf = default_conf

# To use this configuration file with the "-extfile" option of the
# "openssl x509" utility, name here the section containing the
# X.509v3 extensions to use:
# extensions		=
# (Alternatively, use a configuration file that has only
# X.509v3 extensions in its main [= default] section.)

[ new_oids ]
Go all the way to the last line of openssl.cnf and add following
[default_conf]
ssl_conf = ssl_sect

[ssl_sect]
system_default = system_default_sect

[system_default_sect]
MinProtocol = TLSv1.2
CipherString = DEFAULT@SECLEVEL=1
All Done
That’s it! Now restart the machine and your Ubuntu 20 should support TLS 1.1 and TLS 1.0. You may test it out using the free service https://www.cdn77.com/tls-test/
References: I have used following threads to get understanding of TLS support.
https://serverfault.com/questions/824821/how-to-enable-tls-1-1-and-tls-1-0-on-apache/1037435
https://stackoverflow.com/questions/40033804/apache-cannot-enable-tls-1-0-or-tls-1-1
https://serverfault.com/questions/933533/tlsv1-not-turning-off-in-apache
https://askubuntu.com/questions/1233186/ubuntu-20-04-how-to-set-lower-ssl-security-level
Leave a Reply